Showing posts with label Pests and Diseases. Show all posts

Tuesday, June 24, 2014

Disease Resistance: How’d they do that?

In my territory, one thing there is no shortage of is nasty little organisms that are just waiting to take advantage of a defenseless vegetable plant. Here in the southeast our weather can get hot and humid; perfect for all kinds of fungi and bacteria. To make matters worse, insects that can carry viral diseases like Tomato Spotted Wilt and Papaya Ring Spot Virus are all too willing to add to the misery. Fortunately, plant breeders are constantly developing new vegetable varieties that are resistant or tolerant to major disease-causing pathogens.

Genetic resistances can sometimes be the only thing standing between success and total crop failure. One example is resistance to bacterial leaf spot (BLS) in sweet pepper hybrids. When weather conditions favor the development of this disease, there is no effective chemical control - organic or synthetic - that can be applied to the plant. I have personally seen entire plantings completely defoliated due to this pathogen.

The process of incorporating disease resistance into a new variety begins with identifying a suitable source of resistance. This can be challenging as the diversity in cultivated species is sometimes very limited, so breeders often turn to wild crop relatives that they can use in crossing. When the resistance donor is a wild species or related plant which does not look anything like the typical cultivated, the breeder may choose to carry out a back crossing program to eliminate the undesirable wild traits. This method involves selecting progeny from the initial wild x cultivated cross that carry the resistance gene and repeatedly crossing them back to the cultivated parent for several generations until a uniform line which resembles the cultivated plant but has the resistance from the wild donor is created.

Depending on the crop, this process can take many years before a finished line is produced that has the
potential to be a parent in a new hybrid (F1) or an open pollinated (OP) variety. If the resistance gene is recessive, then both the female (seed) and male (pollen) parents of the hybrid would need to have the resistance gene for the resulting F1 seeds to be resistant to the disease. On the other hand, if the gene is dominant than only one of the two parent lines needs to be a carrier.

You might ask how do you know which plants to save for the next generation? In the past, a breeder would expose (inoculate) plants to the pathogen for which resistance is desired. The resulting disease symptoms, or lack thereof, would then be evaluated to determine which plants carry the resistance.

Traditional plant breeding is now being tremendously accelerated by modern breeding techniques that allow you to determine which genes a plant has without having to perform laborious disease screens, simply by taking a tiny bit of plant material (often leaves or seeds) and analyzing it’s DNA for genetic markers (pieces of the DNA that are associated with the resistance genes). These new techniques save the breeder a lot of time and resources because they can eliminate plants without the resistance genes much faster than ever before.

Innovative plant breeding techniques are continually being developed. However, the basic challenges for identifying and utilizing disease resistances in breeding remain the same:
   1. Find a source of resistance
   2. Incorporate it into one or both parental lines
   3. Somehow get back to the original fruit type while “dragging” the resistant genes along for the ride.

A large challenge indeed, but at Johnny’s we appreciate the benefits that resistant varieties offer to our customers and work hard to identify and develop such varieties to support our growers needs.

Rod joined the team at Johnny's as Southeast Sales Representative in 2011. With degrees that include a Bachelor of Science in Biology and a Master's in Agricultural Entomology, Rod has been in the vegetable industry since 1988. 

The majority of his experience has been gained in field production of major vegetable crops. Rod has broad interest in the many different growing systems utilized by Johnny's customers. Located in Tifton, Georgia, Rod enjoys learning about the challenges that growers in the Southeast are facing. 

Current Sales Territory: Alabama, Arkansas, Florida, Georgia, Louisiana, Mississippi, North Carolina, South Carolina, Tennessee, and Virginia. 

Email » rheyerdahl@johnnyseeds.com 
Direct Line » 229-392-3844

Friday, July 19, 2013

Combating Spotted Wing Drosophila and Late Blight

In recent weeks, Spotted Wing Drosophila and Late Blight have been popping up on growing operations throughout the Northeast. Below are some tips for preventing these issues from becoming a serious problem this year.

Late Blight on Tomato
Late blight (Phytophthora infestans) occurs each year in many areas of the United States and the world. There are steps that you can take in order to reduce late blight recurrence this growing season.

  • Pull up and throw away or burn any volunteer potato plants — these sprout from tubers that may have gone unseen in the soil last fall during clean up and/or in the compost pile.
  • Plant certified disease-free potato seed pieces — do not use seed pieces saved from last season.
  • Follow recommended crop spacing and soil fertility, maximize greenhouse and hoophouse air circulation, reduce insect pressures.
  • Cull any and all tomato or potato plants if they display late blight symptoms by throwing away or burning plant debris.
  • Treat plants with a preventative copper spray. We recommend item #9778, Champ® WG Copper Fungicide (OG)
  • Treat plants with hydrogen dioxide for prevention and treatment of late blight infections. We recommend item #9719, Oxidate® (OG).

According to the Vermont Veg & Berry Newsletter, late blight has been confirmed in Franklin County, MA on tomato plants on July 11th, and in Erie County, NY on tomato plants July 10th, and on potato plants July 9th. Previous reports in FL, WV, LA, TN, MD, KY, VA, NC, and WI have been confirmed as P. infestans strains US-23 and US-7. You can track disease progress at USA BLIGHT.

View our informative videos on Identifying Late Blight and Controlling Late Blight at Johnnyseeds.com.

Spotted Wing Drosophila on Beries
Spotted Wing Drosophila (Drosophila suzukii). According to MOFGA’s Pest Report of July 11, 2013, compiled by Eric Sideman, PhD, MOFGA’s Organic Crop Specialist, “The spotted wing drosophila (SWD) has been found in Maine this week, and was found in southern New England a week or two ago.” Here are some need-to-know facts about SWD, per MOFGA’s Pest Report:

  • This fruit fly is a new pest in our region; it is a common pest in parts of Asia.
  • The tiny fly looks like a typical fruit fly, but the males have a spot on each wing that you can barely see with the naked eye.
  • Common fruit flies that we see here only go after overripe and rotting fruit. The SWD is a much greater problem because it can attack sound fruit and has been very damaging to raspberries, blueberries, and other late summer soft fruit.
  • Two years ago was the first year in which it was seen in large numbers in Northern New England.
  • In as few as 8 days it goes from eggs to new adults laying more eggs, so populations can explode quickly.

If you’re battling Spotted Wing Drosophila, you may want to explore our effective Organic Controls for combating this issue. Specifically, Entrust® SC (OG) is extremely effective against Spotted Wing Drosophila. You can learn more about Entrust® SC (OG) on Johnnyseeds.com here »

Friday, June 1, 2012

JSS Advantage Newsletter, June 2012: 3 Steps to Pest Management


June 2012

Slugs

Three steps to pest management

This year's warm winter and early spring have created some unusual pest management problems for growers. In some cases, insect pests and diseases have become active earlier and are more abundant than usual. They may be damaging crops not typically affected. There may even be some pest species that are not normally found on your farm. Whatever pest pressure you may be seeing this year, you can attack the problem in three steps: Identify the pest; choose appropriate pest control products if necessary; and implement management practices to reduce pest pressure in the future.

Step 1: Identify problems

Begin by scouting regularly; at least once a week, walk your fields and inspect all your crops for pest damage. Don't just look from a distance -- get up close and check on the overall health of the plants. Turn over leaves to scout for eggs, aphids, and other potential problems. With root crops, pull up a few plants to be sure they are developing normally. Any time you find a problem, you need to quickly identify its source and determine whether it's a real threat to your crop.
Identifying pests may be simple in some cases -- if your lettuce is getting munched and you find caterpillars on it, you've probably found the culprit. Other times, it's not clear what is causing the damage. It may be an insect that flew away when you touched the plant, too small to see without a hand lens, or one that feeds at night. Sometimes the problem may be environmental, caused by heat, cold, water stress, or nutrient deficiency. In any case, it's important to put a name to the problem before you go further.
Your state Extension service is the best place to seek help with identification. First, do an internet search for your state + commercial vegetable production. Many states have excellent vegetable guides that name the usual sources of problems in your area. If you don't find the answer there, you might try one of these:
Cornell Cooperative Extension Guides to organic production of beans, carrots, cole crops, cucumbers and squash, lettuce, peas, potatoes, spinach. Each guide lists common insect pests and diseases.
The University of California Davis IPM program has a website that lists pests by crop.
Another great resource for photos of insects throughout their life cycles is the Insect Images section of the Bugwood Project at the University of Georgia. If you don't find the answer with your own research, call your state Extension office to seek help. You can find your local Extension office here.

Step 2: Choose the most effective controls

With the problem identified, your next step is to choose appropriate controls. The presence of an insect pest doesn't always require action; natural enemies may take care of the problem for you if it's not severe. Low-cost home remedies may be effective, such as milk for powdery mildew control.
However, if you do need to spray a commercial product, choose the least-toxic method such as horticultural oils and insecticidal soaps. Other options include botanical controls such as pyrethrin (Pyganic) and biological controls such as Spinosad (Entrust) and Bt (Dipel). To find the right product for the problem, consult Johnny's Comparison Charts of Insecticides, Fungicides, and Repellents. Those approved for use on organic farms have the OMRI logo beside the name.
Bear in mind that pests can develop resistance to pest control products very quickly. To avoid that risk, rotate among products with a different Mode of Action. For example, at the Johnny's research farm, we treat tomatoes for Early Blight and Late Blight by alternating the fungicides Champ WG and Actinovate. For more information on preventing resistance, read this article from the National Science Foundation's Center for Integrated Pest Management.

Step 3: Prevent problems in the future

Once you have the current pest problem under control, think strategically about how to avoid a repeat occurrence. Many factors contribute to pest outbreaks and crop damage, so assess whether you could do a better job in these areas:
  • Crop rotation. Don't plant the same family of crops in the same field several years in a row.
  • Variety selection. Look for resistance in the varieties you choose when you know you have a specific disease problem on your farm. Insects that vector specific diseases become less of a problem when you're growing resistant varieties.
  • Weed control. Many pests can be eliminated from the crop field simply by destroying their cover and overwintering habitat in weedy adjacent areas.
  • Water and nutrient management. Healthy plants, growing vigorously, are less susceptible to pest damage.
  • Cleaning up fields. Destroy crop residue as soon as possible after the final harvest. You will destroy insect pests and remove potential overwintering sites for them.
  • Attracting beneficials. Natural enemies can be powerful allies, so do all you can to provide nectar and pollen to keep them in your fields. Consider planting strips of flowering plants to attract and keep beneficials.
For more ideas about prevention and organic controls, see Organic Insect Control for Commercial Vegetable Production from Mississippi State University.

Like Us on Facebook

FacebookJohnny's community of growers on Facebook to connect with others for advice, share your growing stories, and learn about the latest growing tips and Johnny's promotions. When we reach 13,000 "likes" and we'll share a FREE STANDARD SHIPPING* offer code that will be valid for 5 days (US addresses only). To like us on Facebook, hit the "like" button underneath the large cover photo.
*FREE STANDARD SHIPPING. U.S. addresses only. Offer does not apply to expedited shipping charges. Offer may be used only once per customer and may not be combined with any other offers.

Wednesday, December 7, 2011

Pests and Disease: Storage Diseases of Onions

Storage Diseases of Onions

With this year’s growing season done, many of us are storing root crops, bulbs, and everything in between. There’s a lot to be said about pulling an onion out of storage to add flavor to those warm inviting winter comfort foods such as seafood chowder, or the stuffing for the long-anticipated Thanksgiving meal - especially if you spent all summer watching them grow. On the other hand, it’s more than disappointing to pull an onion out of storage and have the neck slough off in your hands. Botrytis Neck Rot is a common disease found in bulbs, particularly in onions post-harvest. It is caused by B. allii, and is the culprit of slimy necks of onions. As for rotten bottoms, that is caused by Fusarium Basal Rot or Fusarium oxysporum f. sp. Cepae.


Botrytis Neck Rot


Fusarium Basal Rot

Life Cycle


Both Botrytis Neck Rot and Fusarium Basal Rot are caused by fungi that reside in soil or plant debris. Botrytis Neck Rot primarily occurs on bulbs in storage and infection is most often initiated at bulb harvest. Mechanical wounds provide entry to conidia on neck tissue. As the disease progresses, neck tissue looks water-soaked, and a yellow discoloration of the neck begins and moves down towards the scales. Soon after that, bulbs break down into a soft, wet mass. After a gray mold develops in between scales, black bodies or sclerotia form around the neck.

Fusarium Basal Rot shows itself as a red-brown rot where the roots of onion bulbs were attached to the basal plate. This rot and discoloration is apparent all around the base and up to the scales. When you cut the onion open, the affected tissue is brown and watery. A white moldy growth is associated with Fusarium Basal Rot, and can be found on the stem plate or diseased scales.

Controls


To prevent post-harvest losses and to ensure more produce that is marketable and edible, proper harvesting, curing, and storage is important. Harvest onions in cool, dry weather after the tops have been allowed to mature fully. At least half of the leaves should be brown. Letting the bulbs dry in the field for 6-10 days can help as well. Do not store onions that have any green growth on them. Botrytis Neck Rot can move through green tissue into the bulb. When harvesting, do your best to minimize bruising or other mechanical damage. Bulbs should be stored in well-ventilated areas that can be kept at 32°F/0°C with humidity below 75%.

Resources


UMass Amherst Vegetable Program
http://extension.umass.edu/vegetable/articles/post-harvest-and-storage-disease-onions-and-garlic.
Shika Agblor and Doug Waterer, Department of Plant Sciences,
University of Saskatchewan
http://www.usask.ca/agriculture/plantsci/vegetable/resources/factsheet/postharvonions.pdf.

Onion Disease Photos courtesy of Ontario Minister of Agriculture, Food and Rural Affairs

Article by Sonya Reynolds, Greenhouse Coordinator, Johnny’s Selected Seeds

Wednesday, September 7, 2011

Pests: Beware the Armyworm

Pest of the Month: Armyworms (Family Noctuidae)

Armyworm

Native sweet corn is popping up everywhere: on farm stands, in local co-ops, at your favorite grocery store, and your town’s farmer's market. Whether you planted a couple of short rows at home, or if you have acres and acres of corn you’re harvesting for market, it’s not unusual to occasionally peel back those tough green husks and reveal that little green worm munching happily away on the sweet kernels. One little green armyworm larvae can ruin a perfectly marketable ear of corn in very little time.

Life Cycle
By definition, an “armyworm” is a caterpillar that has the habit of feeding above ground, can become abundant at times, and occurs in large migrations. In its adult stage as a gray-brown moth with a white dot in the center of the forewing, many species migrate to southern climates such as Mexico and Central America. Some species of the armyworm irregularly survive the winter in the U.S., while other species overwinter as pupa in the soil. Depending on the species, larval development can take from 2-8 weeks. Early stages are smooth pale green, while older larvae reach about 1.5"; turning a greenish brown with white stripes on the sides, dark or light stripes along the back. During the migration from warmer southern climates to northern cooler climates, adult moths lay eggs only at night and on the undersides of leaves. Eggs are greenish white and are laid in huge masses of up to 400 eggs. Younger stages of larvae typically feed only on one side of younger leaves, leaving leaves with a transparent appearance. Older larvae are less discriminating and often consume entire areas of the leaf. Larvae feed only at night and can tunnel into the whorl of young corn. As ears develop, they tunnel into the ears, many times entering from sides and tips. Pupation occurs in a loose cocoon in the soil. Three or four generations are typical in southern climates, while one or two generations are more common for northern U.S. states.

Plants Affected
Vegetables, grasses, corn, legumes, fruit trees, and flowers are occasionally damaged.

Symptoms
Tunneling into whorls, shredded leaves, transparent younger leaves, and in grasses a chewed ragged appearance.


Controls
Attracting natural, native predators such as parasitic wasps and flies. Live releases can be made on a regular schedule based on the army worm’s life cycle. A BTK spray can also be used to kill larvae. Dipel DF is a product we’ve made available to our customers and is a very effective method of control. We also use this product on a regular basis for tomato hornworms in our covered structures here on the farm. As always, follow label mixing and handling instructions completely and always wear the proper protective clothing. 

Resources
“The Organic Gardener’s Handbook of Natural Pest and Disease Control” Edited by Fern Marshall Bradley, Barbara W. Ellis, and Deborah L. Martin
“The Ultimate Guide to Backyard Bugs Garden Insects of North America” by Whitney Cranshaw
“Vegetable Notes” published by U Mass Extension, written by R Hazzard

Article by Sonya Reynolds, Greenhouse Coordinator, Johnny’s Selected Seeds

Tuesday, July 19, 2011

Video: How to Get Rid of Japanese Beetles

A great video from our friends at the University of Maine Cooperative Extension on dealing with Japanese Beetles:

Saturday, July 2, 2011

Pests and diseases: Colorado Potato Beetle

Colorado Potato Beetle (adult stage)
Colorado Potato Beetle (larvae)

Colorado potato beetle (Leptinotarsa decemlineata)

We've been battling Colorado Potato Beetles for much of the previous month. If you are not trying to keep them off your potatoes, you’re trying to keep them off of your eggplants and vice versa. Amazing how a relatively small insect can strip a seedling of its foliage in a matter of a day or two. By the time a “herd” of potato beetle larvae make themselves across a seedling, you're most often left with stems and ragged little shreds of foliage, all of which will be delightfully coated in the excrement from the Colorado potato beetle adults and larvae.

Life Cycle

Adult Colorado Potato beetles, about 3/8” long, emerge from overwintering near previously infected crop plantings. The adults have alternating yellow and black stripes that run along its back. The larvae stage, are orange-red with a dark head and some spotting. After feeding for several weeks, females lay masses of yellow-orange eggs on undersides of leaves. Females are known to lay close to a 1,000 eggs in their short life span of several months. Eggs hatch in four to nine days and the larvae can feed for two to three weeks, they then pupate in soil. The adults will then emerge in five to ten days, most areas will see two generations. There can be three in southern states.

Plants Affected

Potato, eggplant, nicotiana, petunia and certain nightshade weeds are preferred foods of the Colorado potato beetle adult and larvae.

Symptoms/Damage
Adult Colorado potato beetle and larvae chew on the foliage of host plants. Damage typical of the adults is notching wounds along the leaf margins. The larvae however can cause the most damage to seedlings, leaving much more ragged injuries, resulting in devastating foliage loss. Foliage may also be soiled with excrement. When large outbreaks occur entire plantings may be stripped of foliage.

Controls
There are many controls available to home gardeners and commercial growers to help combat this nuisance pest. Small scale home gardeners can venture out to the garden early in the morning and shake adults onto a drop cloth, then dropping collected beetles in a bucket of soapy water. Hand picking of both the adults and larvae is another option for home gardeners. Scouting on the underside of foliage for Colorado potato beetle eggs and destroying them by squishing them is another option. Mulching plants with at least four inches of straw (to discourage larvae from pupating in the soil) and floating row covers until harvest or mid season can be very effective methods of control.
On a larger scale, releases of five spined soldier bugs can be an effective, non-spray approach, as well as releasing parasitic nematodes in the soil to attack larvae.
When cultural and biological controls have not solved the problem, organic controls such as Entrust (Spinosad) applied via backpack sprayer or tank sprayer to foliage of potato plants or the foliage of other damaged crops. This should be applied as soon as you see Colorado potato beetle adults or larvae. Correct timing of applications and appropriate application rate is particularly important to maintain when using Entrust, so as not to develop resistance to Spinosad. Waiting until the infestation is severe will result in heavy loses, repeat spray as necessary to maintain control.
At last resort introducing Pyganic into your spray program for these crops can be effective in maintain population control of the Colorado Potato Beetle. When applying any pesticide be sure to read labels thoroughly and follow mixing and spray instructions specific to infestation. Always wear personal protective equipment as stated in label instructions.

Resources
“The Organic Gardener’s Handbook of Natural Pest and Disease Control” Edited by Fern Marshall Bradley, Barbara W. Ellis, and Deborah L. Martin
“The Ultimate Guide to Backyard Bugs Garden Insects of North America” by Whitney Cranshaw
“Vegetable Notes” published by U Mass Extension, written by R Hazzard

Article by Sonya Reynolds, Greenhouse Coordinator, Johnny’s Selected Seeds

Tuesday, April 5, 2011

Pests and diseases: Cabbage Worms

Cabbage Worm Photo by Jack Kelly Clark

I’m sure we all have our favorite cool-weather spring/fall crops. For those of you who love your brassicas, such as cabbage, cauliflower, kale, and Brussels sprouts, the Imported Cabbageworm can prove to be your arch nemesis. Yes, that’s right; an arch nemesis that you’ll battle with all growing season. One that will leave large holes on those big, beautiful, waxy seedling leaves.

Who would think such a seemingly intoxicated worm, moving around in its slow, sluggish manner could be capable of such damage? You may even mistake some of these voracious feeders to be dead. But if you watch closely, it will crawl away dropping greenish brown fecal pellets to further ruin marketable product. You think….at least… in its adult stage it’s pretty.


Life Cycle
Eggs
 
-laid singly on the underside of leaves
-are yellowish to white and cone shaped

Larvae
-green, very hairy with one faint yellow-orange 
stripe down backs/broken stripes on sides
-up to an inch long
-feed along midrib, at base of wrapper leaves, bore into heads

Pupae
-green with faint yellow lines down the back and sides
-do not have a spun cocoon
-larvae pupate attached by a few silk strands

Adults
 
-white with 1-4 black spots on wings (often seen fluttering around fields)
-yellowish underside of wings
                
In the northern U.S. and Canada winter is spent as a pupa in plant debris near or in previously infested crops - yet another reason to stress a thorough fall clean up. Adults emerge from the overwintering pupae in early spring to lay eggs. The larvae hatch in 3 to 5 days and are fully grown in 2 to 3 weeks. During this period they feed voraciously. They then pupate on plant debris settled on the soil near infested plants, and the adult butterflies emerge in 1 to 2 weeks to lay eggs singly on the undersides of leaves.

Plants Affected: Brassicas such as cabbage, cauliflower, kale, and Brussels sprouts

Symptoms: Feeding larvae produce large irregular holes in leaves and heads of cabbage. Older larvae tend to feed extensively on the newer growth, but can also ruin heads by tunneling. Large populations of larvae can also result in loss of marketable product from contamination by fecal matter left by heavy larvae infestations feeding.

Controls: Weekly scouting is a key method of prevention and control. Destroy any eggs, pupae, or larvae squishing by hand or with a rock on the ground. Beneficial insects are a great method of control and are readily available from many vendors, some as local as New Hampshire. Floating row covers applied directly after transplanting or direct seeding can be a very efficient means of control and prevention. There are many “home remedies” such as garlic or hot pepper spray that can be applied on a weekly basis by using a small hand sprayer or larger backpack sprayer. This should be done as soon as butterflies appear. For large plantings, involving many row feet, or entire fields, a tank spray with a pesticide containing BT or spinosad as the active ingredient can also be used. When applying any pesticide please be sure to read and follow and label instructions thoroughly. 

Resources
Resources: "The Organic Gardener's Handbook of Natural Pest and Disease Control" Edited by Fern Marshall Bradley, Barbara W. Ellis, and Deborah L. Martin
“The Ultimate Guide to Backyard Bugs Garden Insects of North America” by Whitney Crenshaw
-“Cole Crops Imported Cabbageworm” UC IPM Online
http://www.ipm.ucdavis.edu/PMG/r108301111.html.
-ALL Photographs taken by Jack Kelly Clark
-Permission for use of photographs by UC IPM Online

Article by Sonya Reynolds, Greenhouse Coordinator, Johnny’s Selected Seeds

Wednesday, March 2, 2011

Pests and diseases: Damping-off

Damping-off

As spring gets closer and closer, many of us are feeling that urge to get our hands in the dirt - especially after long winter months of drooling over seed catalogs and just dreaming of what our gardens will become in the nearing growing season. Perhaps you've gotten a packet or two of some longer season flowers that you just couldn't bear to wait any longer to plant. After a few long days you've noticed some seeds have germinated and are doing well, a beloved sight of fresh green growth. Others, though, after germinating are starting to pinch and drop at the stem an inch or so above the soil line. A couple more days pass and there are many empty spots in the seedling tray, where it appears many seeds did not germinate. Upon closer inspection, you find they did indeed germinate. Many died before even popping green shoots toward a lovingly placed grow light. It's then that you know your precious seeds and seedlings have dampened off.

Life Cycle/Symptoms:
Damping-off, a disease primarily caused by fungi, affects germinating seeds and seedlings.  Pythium, Phytophthora, Rhizoctonia and Alternaria are all fungi that commonly cause damping-off. Hundreds, even thousands of seedlings can become colonized by damping-off fungi, resulting in large losses. Emerging shoots of germinating seeds will have a water-soaked appearance or look visibly decayed, while seedlings will develop a shriveled, darkened pinched appearance at the soil line to an inch above the soil line. Tops of these seedlings may appear healthy, but over night infected plants topple over. Roots may or may not be rotted. Often, the fungi that cause damping-off can be easier noticed in beds or flats, as it will travel out in a rough circular pattern. Plug trays inhibit this circular growth pattern. Seedlings grown indoors in greenhouse settings in containers are often more susceptible to damping-off than those in the field.

Plants Affected:
All plants

Controls: The best method of controlling damping-off is to have firmly established cultural control practices in place. This means growing seedlings in well-drained soil with plenty of light. Air circulation is another factor. If you're at home and don't have the luxury of a greenhouse with circulation fans, use a small oscillating fan pointed at seedlings. This will help the soil to dry out faster, and keep leaves and stems dry. Avoid overhead watering. Instead of a watering can, place plug cells in a shallow tray of fresh water and then remove the tray when the top of the soil medium is moist. Using a sterile potting media can reduce the risk of bringing damping-off contaminated media into your home or greenhouse. Unwashed hands, gloves, clothing and footwear can also provide means of the various fungi to enter the greenhouse or home.

It is also very important to keep trays and hose ends up off the floor were fungi can collect in loose debris or stagnant puddles. A drench can also be done on the potting medium with an approved fungicide like Champ® WG. This copper hydroxide-based fungicide is approved for a broad-spectrum of disease/fungi control. As always, follow label instructions carefully and always wear the proper personal protective equipment.

Resources: "The Organic Gardener's Handbook of Natural Pest and Disease Control" Edited by Fern Marshall Bradley, Barbara W. Ellis, and Deborah L. Martin
UMass at Amherst Cooperative Extension

Article by Sonya Reynolds, Greenhouse Coordinator, Johnny’s Selected Seeds

Wednesday, January 26, 2011

Pests and diseases: Mealy Bugs

Mealy Bug | Photo Courtesy of Greenmethods.com

The philodendron you’ve patiently been watching uncurl and stretch new vining tendrils upwards, sideways, and downwards around your windowsills all spring, summer, and fall now looks like it’s been attacked by the local kindergarten class covered in marshmallow fluff. The fluffy white masses you’re seeing stuck all over the plant in front of you are actually eggs laid by a female mealy bug.

Life Cycle: The mealy bug of the Pseudococcidae family, are soft bodied insects, covered with a fine whitish wax. Many species of mealy bugs produce noticeable egg sacks enclosed in a cottony wax, resembling white “fluff”. It’s these white masses that are most often noticed in terminal growth, cracks, and crotches of plants and can contain up to 600 eggs. In greenhouses, females have been observed to lay eggs on non-plant surfaces, and can live more than 2 weeks off the plant. The eggs hatch after 7 to 10 days. The yellowish nymphs, known as crawlers, move about the plant until a desirable site is found for feeding. As in the above picture, mealy bugs are generally oval shaped, having 17 to 18 pairs of short wax filaments (legs) along the side of the body. The body is distinctly segmented, averaging about an eighth of an inch when in last adult stage. Females undergo two molts before becoming fully grown. The rarely observed males undergo an additional developmental stage which occurs in a small cocoon of loose wax. Males are much smaller than the females, have wings, and do not feed. One generation of mealy bug can run full cycle in about a month under ideal conditions indoors.

Monday, January 10, 2011

Pests and diseases: Spider Mites

Spider Mites | Photo courtesy of greenmethods.com

Perhaps you've begun to notice some of those plants you've brought inside for the winter have started to show slight to moderate signs of declining vigor. On top of the declining vigor, leaves that were once healthy and shiny are now slightly curled. Dotting the curling leaves are pale yellowing flecks, increasing in amount by day.

Then, you spot it … the minute, dense webbing on the underside of leaves. Upon final inspection with a hand lens, miniscule straw-colored creatures with a dark blotch or spot on either side of their bodies are found. A conclusion has been reached: You've got an infestation of Two-spotted Spider Mites or Tetranychus urticae on your hands.

Life Cycle: This temperature-regulated species has its greatest activity during periods of warm weather; but can also be found making itself comfortable inside your home where the air is very dry and temperatures are warm at this time of year. The life cycle starts with eggs that hatch into tiny six-legged larvae. This stage is then followed by two, eight-legged immature stages, followed by the final transformation into the adult stage. These tiny pests have a "resting" stage, called the chrysalis, that precedes each molt. Males and females both occur in populations. Produced at only certain periods, males are smaller than the females. In the absence of a male population, reproduction is asexual.
These voracious pests feed with a piercing mouthpart, enabling them to suck out the sap of the phloem (inner cells of plant). Once the sap is depleted from each cell, it collapses.  It's this you see as yellow stippling on leaves, where feeding has taken place in clusters of cells.  Due to the manner in which they feed and the design of their mouthparts, two-spotted spider mites are very capable of transmitting various plant diseases. They are seldom held responsible as they are generally homebodies, and rarely leave a host plant of their own volition. 

However, dispersal of populations can occur through human and/or animal contact. Simply brushing up against an already infested plant will leave you walking away with four or five clinging to a shirt sleeve. Coming in contact with house or garden plant(s) shortly after gives the stealthy little mites an easy way into your home. Outside, as mites move their way up to tips of foliage, wind can blow them into air currents and subsequently onto new plants. Semi-dormant adult females overwinter under sheltering debris near previously infested host plants. The adult females appear reddish orange during semi-dormancy.  In spring, weeds and early greens crops provide food before later-season plantings are done.

Plants Affected: Roses, pears, raspberries, peppers, asters, marigolds, impatiens, geraniums, sage, and thousands of other agricultural crops and house plants.

Symptoms: Pale, yellowing stippling at feeding sites on leaves due to loss of cell contents. Plant vigor is seriously reduced as a population grows in size. Premature leaf drop begins as leaves shrivel and dry out. Dense silk webbing is visible when populations are high.

Controls: Although many populations of two-spotted spider mites show a high resistance to pesticides, there are some effective control methods out there. There are many biological pest control agents available on the market today. Green Methods, located in Nottingham, NH, offers several predatory insect species geared specifically towards the many different kinds of spider mites. Neoseiulus fallacis resemble tiny spiders with their eight legs, but are predatory mites that feed on the very young and egg stages. Shipped to you as adults and immatures, they work very well as both a preventative and control measure. Weather conditions, such as temperature and humidity, need to be taken into consideration before release of these beneficial insects. Make sure to follow enclosed instructions on storage and release to ensure optimal results.

 For those of you who would prefer to fight these pests chemically, there are some pyrethrins on the market that can be effective as well. Liquid Rotenone-Pyrethrin Concentrate is a product that we offer here at Johnny's. Another product we have available that can be helpful in controlling a population, that is safe, easy to use, and certified organic, is Safer Soap.

 With a base of Potassium Salts derived from fatty acids, this is a product that can be applied to infested house plants with very minimal risk to the rest of your household. Dish soap diluted at a high rate can also prove effective when applied with a clean spray bottle. As always, read label instructions carefully and follow all safe handling procedures and disposal methods as outlined in pesticide label instructions.

Resources greenmethods.com and "The Ultimate Guide to Backyard Bugs Garden Insects of North America" written by Whitney Cranshaw
Article by Sonya Reynolds, Greenhouse Coordinator, Johnny’s Selected Seeds

Thursday, December 23, 2010

Pests and diseases: Botrytis Blight or Gray-Mold


Photo courtesy of Dion Mundy

Life Cycle: Botrytis Blight or Gray-Mold is a common fungus disease found in many greenhouses and field crops. Caused by Botrytis cinerea, the disease is often referred to as gray-mold due to the gray, fuzzy-appearing spores which cover the surface of infected plant tissue. Botrytis can cause dampening off, fruit rot, root rot, leaf, and flower blight. Some species of Botrytis can develop sclerotia in dead plant tissue in which it can overwinter. The sclerotia can then germinate in the spring, if in the field; sclerotia can be spread from one plot to another in soil stuck to equipment (plows, tillers, etc.).  Fungal mycelium can also overwinter in dead plant debris, creating a host for conidia (infectious spores) to develop. These conidia can be windborne or splash onto host tissue from overhead watering or rain.

Germination, infection, and disease development is dependent on a specific range of temperature and humidity. In order for the germination of spores and infection of the plant, a film of moisture (dew) must coat the plant for 8-12 hours with humidity of 93% or greater and temperatures between 55-75°F/13-24°C. Gray-mold is much more common in spring and fall months. It can infect plants at any stage, but freshly injured tissues, new, tender growth or aging, dead tissues are preferred.
   
Plants Affected: Vegetables, ornamentals, fruits, and herbs.

Symptoms: Brown lesions on plant material that develops after periods of cool, drizzly, rainy weather. Look for masses of fluffy, silver-gray spores on dead and dying tissues and/or tiny black sclerotia.

Controls: In greenhouse settings, maintaining strict sanitation practices is always key. Remove all dead/dying plant debris off of benches, floors and plants themselves. Empty trash/compost everyday to eliminate places for Botrytis to thrive.  Inspections of all crops in greenhouses should be done on a weekly, if not daily basis. Not only will this help you spot Botrytis, but other plant pests as well.

Sanitizing benches, work areas, utensils and reused pots with a fungicide such as Oxidate will also help to kill any gray-mold spores.  Correct spacing of plants on benches/floors will also help by promoting good air circulation and by reducing humidity within the plant canopy.  Reducing the humidity with proper ventilation and heat can also play a major role in preventing an infection of gray-mold, and other plant diseases.  The use of circulation fans, even in a closed greenhouse can help reduce moisture on plants, by creating a more uniform temperature.  Thus reducing the chances of cool spots in the greenhouse in which dew can form on plants.  Avoiding overhead watering can also be very helpful in preventing infection.  If overhead watering, misting, etc., can not be avoided, good air circulation can again benefit plants by promoting rapid drying of vegetative surfaces.

In field crops, cleaning equipment in between plots can be very helpful, but time consuming.  Washing hand hoes, spades, plows, tillers, etc with water can remove dirt or plant debris that could contain, conidia or sclerotia.  Removing all infected plant material from the field during crop growth by way of culling or pruning can also be very helpful.

Remember, Botrytis can overwinter in several forms, so bagging and trashing culls or burning them is always the best method of disposal.  If culling or pruning is not an economically favorable control method, a fungicide such as Champ or Kocide 3000 can be applied by means of spraying.  When using any type of pesticide read product label in full and follow label instructions as specified by that particular product.

More information:
Benzimidazole management strategy
UMass Extension Pest Management: Botrytis Blight of Greenhouse Crops
Article by Sonya Reynolds, Greenhouse Coordinator, Johnny’s Selected Seeds

Thursday, November 18, 2010

What's new at the Farm? Winter beckons

The middle of November already! Where has the time gone? I guess we were so busy harvesting and trying to get everything done before the weather got cold, by the time we sat back and looked around the leaves were gone along with the birds and winter is quickly approaching. Although it's been a great fall, warm and pleasant, we'll be plunged into cold and wind before we're ready as usual. Time is upon us to get what we need to get done before the cold weather moves in. The darkness comes so early now it's near impossible to get anything done after work and everything gets put off to the weekends.

The field work here is wrapping up with the plastic being pulled out of the fields. That'll be our next to last activity in the field for the 2010 growing season. Our last task will be chisel plowing along the contours of the field to prevent winter erosion. It's too late to plant any cover crops now so we'll rough up the surface to catch the water and prevent erosion. It's wet right now and an inch of rain is in the forecast, but once that dries up we'll get out there one more time.

The winter rye we planted the week of October 17th is up and growing but slowly. Mid October is pushing the "best planting window" and growth is marginal through the late fall. Winter rye will technically grow down to 32 degrees but it's very slow. The brassicas we planted are doing much better; they really enjoy the cooler weather and frequent rains of fall in Maine. The warm fall weather has helped our cover crops grow but, alas, all good things must come to an end.

Fall activities, besides wrapping up the field work, include banking of the older buildings, recovering greenhouse No. 3 and storing everything we can under cover or out of the way of the snow plowing crew. All the tractors get a thorough going over and the a good pressure washing. Then, after drying, they'll go into storage until next season. Same with the equipment.

Now is a good time to look for holes around buildings where critters will try to get in before winter. Newer buildings aren't as prone to critters as the older ones and the greenhouses. An unused or "closed for the winter" greenhouse is an excellent spot for a rat to spend the winter. One of the best ways to keep them from settling in is to deny them a food source; not easy if you have animals or like to feed the birds. Here we clean the greenhouses prior to closing them down for the winter and at home I keep feed and seed in steel garbage cans. Still they get in, and more than once I've switched the lights on to see them scurry around.

A rat is a very smart creature; smart like a coyote. As much as they have been trapped and poisoned they thrive. They live in and under buildings, in compost piles and thrive on our throw away materials. I've seen them under our bird feeders, scavenging seed and chasing away the squirrels, I've seen them in my workshop keeping warm next to the hot water pipes and I've seen many of them in the greenhouses during the winter and early spring. Wanting to get into my birdseed bin they chewed a hole in the plastic cover, and I would have never known, but one popped out when I went to fill it up.

A couple of years ago we started seeing colored rats; multicolored rats, mostly brown and white but sometimes black and white or just black or white. My neighbor has been seeing them too, so it's not just me. I'd speculate someone released some domestic ones nearby and they bred with the wild ones but that's only speculation. They don't seem to be as wary nor as wild as the regular rats. It does add some variety to just trapping old fashioned brown rats. Yes, things can get pretty slow at times. Catch one rat and the others learn real quick that a trap means death, and they'll avoid it. Like I said; they're smart.

I'm off next week so there won't be my usual column. Time to get some stuff done before winter sets in. I think what little bit of garden I had this year needs to be cleaned up; I guess I can mulch the blueberries now. The Brussels sprouts will be ripe for harvesting and everything else can get pulled up. I didn't get a cover crop planted so will leave the weeds there to protect the soil. There's a little more work to do on the woodpile and that'll be done. And there's lots of chicken manure to take out of the buildings and apply to the garden, well anyways, I think I can find enough projects to keep me busy.

See you in December, Brian

Thursday, September 9, 2010

Pest of the Week: Gray Wall/ Blotchy Ripening

Blotchy Ripening

Gray Wall/Blotchy Ripening of Tomato

Life Cycle: Gray Wall or Blotchy Ripening is a physiological disorder that can be caused by several environmental factors. Extreme high heat, high humidity, temperature fluctuations, low light levels during high temperatures (potentially from dense vine coverage, or from fog or clouds during hot weather), high nitrogen, low potassium, low boron, bacterial/fungal infections, TMV (Tobacco Mosaic Virus), or excessive soil compaction can all potentially contribute to gray wall/blotchy ripening. Some of these causes seem contradictory, but the disorder is believed to be caused by many different factors contributing to the symptoms listed below.

Plants affected: Tomatoes

Symptoms: Tomato fruits look as though they have uneven ripening. When still green, areas of gray wall/blotchy ripening may appear gray or brown from the outside. As fruit ripens, it will have blotchy green or yellow areas. Yellow shoulders are another symptom that can be observed with or without other symptoms listed here. Upon cutting the fruit open, there may be areas of yellow, brown, or white tissue in the fruit wall, denoting uneven ripening. There are varying degrees of symptoms involved with this disorder.

Control: Keep plants healthy by providing a well-rounded nutrient and irrigation program. A soil test on a yearly basis where tomatoes are/will be grown is recommended to assess what soil nutrient requirements will be. Keeping tabs on the weather is important. If hot cloudy or hot foggy weather is predicted, then removal of the leaf blade above ripening fruit will allow more light to penetrate the canopy. Be aware that too much canopy removal and high light levels can cause sunscald. It is important that the plant has adequate potassium levels in the soil. Grow varieties that are resistant to TMV.

Resources:
http://www.extension.org/article/18629
http://vegdis.cas.psu.edu/VegDisases/Identification_files/tomatodis.htm
http://nwrec.hort.oregonstate.edu/tomato.html

Thursday, August 5, 2010

Pest of the Week: Bottom Rot

The University of Arizona, College of Agriculture and Life Sciences

Lettuce Bottom Rot (Rhizoctonia solani)

Life Cycle: Bottom rot prefers warm, wet conditions. It overwinters in the soil in decomposing organic matter, persisting mostly as mycelium. Bottom Rot can form very small sclerotia (tight masses of mycelium that can live for longer periods of time than mycelial strands). Bottom Rot in the soil is attracted to a crop when it is transplanted. It is possible that some strains of Rhizoctonia solani prefer certain crops.

Plants affected: A very wide host range to include, but not limited to, lettuce, crucifer (cole) crops, endive, escarole, pepper, eggplant, radish, turnip, cucumber and many other fleshy plants.

Symptoms: Lettuce seedlings are most susceptible at transplant time. The seedlings will show signs of damping off, coupled with brown lesions on stem and leaves, and rotting root systems. Older plants will rot from leaves touching the soil. From there the disease moves into the bottom leaves and crown causing brown lesions to appear. The lesions may appear to be furry brown spots with brown liquid seeping from the leaf tissue. Secondary pathogens can move in causing severe rot throughout the head.

Control: Keep greenhouses, flats, and benches where transplants are grown disinfected and clean throughout the year. Clean tools, hands, and field equipment to avoid spreading the disease. Crop rotation is very important since bottom rot can live in soil organic matter for long periods of time without a crop host. Cotton and alfalfa harbor Bottom Rot so avoid these crops in rotation where this disease is prevalent. Be certain that crop residues that were plowed under are fully decomposed before planting a new crop into the field. Plant lettuce crops in well-drained soil in raised beds. Plant seedling transplants high with about 1/4 in. of the root ball above the soil line. Do not over water the crop. If Bottom Rot is known in fields where planting, utilize erect cultivars of lettuce to avoid leaves touching the soil. Use Oxidate® (#9719) to disinfect greenhouses, benches, and plug flats. Where Bottom Rot is a problem, treat field soils with Actinovate® (#9804 2-oz, #9900 18-oz) in the off-season to build up beneficial bacterium colonies. In small plots and home gardens, Actinovate® can be used as a spray on the plants themselves as a preventative. Read all product labels in full and follow label instructions as specified for that particular product.

Resources:
http://ag.arizona.edu/plp/plpext/diseases/vegetables/lettuce/lettucebr.htm
http://www.ipm.ucdavis.edu/PMG/r441100811.html
http://www.umassvegetable.org/soil_crop_pest_mgt/crops/BottomRotofLettuce.htm
http://www.cals.ncsu.edu/course/pp728/Rhizoctonia/Rhizoctonia.html

Tuesday, July 27, 2010

Friend of the Week: Lady Beetles

Lady Beetle
(Coccinellidae Family – many different species)

Why a Friend: Known as ladybugs, ladybird beetles, and lady beetles, larvae and adults aggressively eat soft-bodied insects. There are many native populations in any given spot throughout the world. The Mexican Bean Beetle is a well-known member of the Coccinellidae Family and is not carnivorous. Both larvae and adults of this species prefer eating bean plants.

Predator of: Aphids, mealybugs, whiteflies, scale insects, thrips, psyllids, and spider mites. Lady beetles can eat 40-50 aphids per day and 200-500 within their lifetime.

Life Cycle: Adult lady beetles overwinter in field edges under rocks and leaf litter. They prefer any protected area and sometimes they choose to come inside homes. When encountered inside the home, the insects can be transferred outside into a sheltered spot for the winter. In warmer climates, the adults will slow their development relative to the temperature. Adults emerge in the spring looking for a food source and place to lay eggs. Eggs are laid in masses or singly, depending upon the species, where there is a source of food for the newly hatched larvae. The eggs hatch and larvae begin to feed right away. Lady beetle larvae look like small alligators with six distinct legs. These larvae can differ in color and size, depending upon species. Some are black and/or gray with red or yellow spots. They go through three instar stages before forming a pupa. The adult emerges from the pupa to find a mate and feed on prey.

Lady Beetle Larvae

How to Identify: The lady beetles have three body segments: the head, the pronotum, and the abdomen. The elytra (wing covers) cover the abdomen and can vary in color from yellow, brown, red, to black. Spots are present on some species and not on others and can be variable within a species. Ohio State University has published a Fact Sheet on Lady Beetles as well as an Identification Guide with images and features of common species. Keep in mind that native populations may vary in certain areas, so it is best to check with local cooperative extension agencies when it is critical to positively identify certain species. Lady beetles will exude a pungent-smelling odor when disturbed.

How to Attract: Lady beetles eat mostly soft-bodied insects but occasionally supplement their diet with pollen and nectar. Planting an insectary garden will help bring in native lady beetles by attracting aphids that will not be pests on vegetable crops. These plants will also provide pollen and nectar as an alternate food source for lady beetles. These insectaries will attract other pest predators, as well. We recommend planting the following and letting them go to flower in your insectary planting: Beneficial Insect Attractant Mix (#1832), Colorado Yarrow (#1338), Genovese Basil (#911G), Blue Spice Basil (#181), Mrs. Burns’ Lemon Basil (#774), Common Chamomile (#914), Santo Cilantro (#2928), Bouquet Dill (#920G), Grosfruchtiger Leaf Fennel (#2395), Forest Green Parsley (#529), White Dill Ammi (#1034), Jewel Mix Nasturtium (#1420), and Mammoth Red Clover (#980G). Discouraging ants from ‘farming’ aphids will aid in the lady beetles’ access to their prey.


Further Resources


View all Johnny's seed varieties that Attract Beneficial Insects »

To learn more, visit our Grower's Library for articles on Attracting & Putting Beneficial Insects to Work »


References:

http://www.ext.colostate.edu/pubs/insect/05594.html
http://www.nysaes.cornell.edu/ent/biocontrol/predators/ladybintro.html
http://edis.ifas.ufl.edu/in327
http://ladybeetles.osu.edu/images/Lady_beetle_guide_5-6.pdf

Friday, July 9, 2010

Pest of the Week: Wireworm

Wireworm

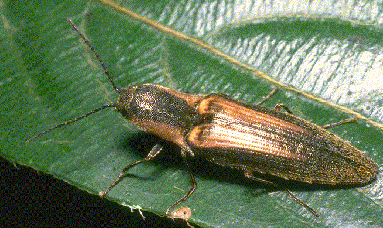
Wireworm, larvae of the Click Beetles (Many species)

Wireworms are pests on many crops like potato, corn, grain crops, and other various vegetables. They live for years in the pupal stage, therefore making them a difficult pest to eradicate.

Life Cycle: Wireworm adults (click beetles) lay eggs in groups in the soil. Adults are active at night during the summer months. Eggs hatch and larval forms dwell in the soil for 2-5 years until pupating into the adult click beetle. The inch-long larvae are light brown in color. They seek deeper soil when the weather is very hot or very cold but are commonly found in the top 8-10” of the soil. Larvae tend to be found in wetter parts of a field or in fields that were recently turned from sod into cropland; although, larvae can be found in fields that have been in cropland for many seasons.

Click Beetle

Plants affected: Crop damage occurs during the wireworm’s larval stages. Larvae feed on seeds, roots, and tubers. Wireworms are attracted to and feed on corn and grain seed, and potato seed pieces and tubers. This feeding can reduce a crop stand, thereby reducing overall yields. Wireworms will also burrow into tubers damaging the crop and making it unmarketable. When soil is drier, wireworm damage tends to be higher on tuber crops due to the pest seeking moisture from the crop.

Control: Population density estimates can be inferred from larvae caught in bait stations. Bait stations consist of a shallow hole dug in the field, 6-8” deep and 3-4” wide, filled with corn or wheat, and covered with a piece of black plastic. The bait hole is left for a week then dug up to count wireworm larvae. Several of these bait holes should be placed in a one-acre field to assess accurate populations. Screening can also give a grower an estimate of how much wireworm pressure is in a field. Screen a one foot square area, 6-8” deep. Several of these samples should be taken in a one-acre field. If there is one wireworm found in the square foot of soil screened, then the pressure is considered high. This is not an adequate method for control. Rather, it is a way to determine if a field is appropriate for crops that are susceptible to wireworm damage. If wireworm pressure is deemed high, choose crops that will not be as susceptible to their damage. There are conventional pesticides that are labeled for wireworm. A biological control consisting of a fungus that infests insects has been scientifically researched and proven as effective as conventional controls for wireworm. Johnny’s is investigating carrying such a product. Read all product labels in full and follow label instructions as specified for that particular product.

Resources:
http://www.mainepotatoipm.com/ipmfactsheets/wireworm.pdf
http://pubs.ext.vt.edu/2812/2812-1026/2812-1026.pdf
http://www.sbreb.org/research/ento/ento06/EffectivenessOfMetarhizium.pdf

Friday, July 2, 2010

Friend of the Week: Hover Fly


Hover Fly or Flower Fly (many different species) – Order Syrphidae

Why a friend: Larvae of the hover fly eat crop-damaging and disease-transmitting insects. There are many species of hover fly throughout the world. Adults are easily attracted to where a grower needs them. Hover fly larvae consume as many and sometimes more pests than ladybird beetle larvae. Adult hover flies help pollinate plants as they feed on the nectar and pollen in the flowers.

Predator of: Aphids, small caterpillars, thrips, scales, and other small soft-bodies insects

Life Cycle: Adults lay eggs on the undersides of leaves of crops that have pests present. Eggs hatch and the larvae begin feeding. Larvae pupate into adults in 10-30 days, depending upon the temperature. These beneficial insects overwinter in colder climates as pupae in the soil or on crop debris. In warmer climates there will be adults and larvae present all year. Pupation will occur at 30-33 days during the cooler temperatures of winter in southern regions.

How to Attract: Native populations of hover flies are easily attracted to pest populations with well-positioned insectaries. An insectary is a garden planted to attract beneficial insects. Insectaries can be planted with white alyssum, yarrow, cilantro (let it go to flower), parsley (let it go to flower), basil (let it go to flower), anything in the carrot family, clover, nasturtium, buckwheat, ammi, golden tuft, dill, cosmos, mizuna, hairy vetch, and chamomile. Insectaries planted in the immediate area of the target crop will be the most beneficial. Plant an insectary outside the open end wall of a hoophouse. Adults will fly into the hoophouse to lay eggs on the crop plants. Insectaries can also be placed in strips between fields, put into a planting plan within the field, or planted into containers. The containers allow them to be mobile so you can place them just about anywhere you need them. We recommend planting any of the following and letting them go to flower in your insectary planting: Beneficial Insect Attractant Mix (#1832), Colorado Yarrow (#1338), Genovese Basil (#911G), Blue Spice Basil (#181), Mrs. Burns’ Lemon Basil (#774), Common Chamomile (#914), Santo Cilantro (#2928), Bouquet Dill (#920G), Grosfruchtiger Leaf Fennel (#2395), Forest Green Parsley (#529), White Dill Ammi (#1034), Jewel Mix Nasturtium (#1420), Mammoth Red Clover (#980G).

How to Identify: These true flies (in the Order Diptera) float over crops and duff (thick layers of organic matter on soil surface) like a kite, seemingly not moving. They are a rare exception in the insect world in that they can fly backwards. They have one set of wings, unlike the insects that their body color mimics (wasps and bees in the Order Hymenoptera) who have two sets of wings. This mimicry is thought to deter predators from eating the hover fly because of potential stinging. Hover fly larvae are not easily found, even for entomologists. They resemble a slug or worm that is about 4-8mm long and can be off-white or light green in color. Adult populations are easy to spot when there are aphids or other soft-bodied pests present. They hover over the crop looking for a good place to lay eggs, and will land and feed on the nectar and pollen of flowers nearby.

Further Resources


View all Johnny's seed varieties that Attract Beneficial Insects »

To learn more, visit our Grower's Library for articles on Attracting & Putting Beneficial Insects to Work »

References:
http://aggie-horticulture.tamu.edu/galveston/beneficials/beneficial-28_hover_or_syrphid_flies.htm
http://insects.tamu.edu/fieldguide/cimg232.html
http://www.uky.edu/Ag/CritterFiles/casefile/insects/flies/syrphid/syrphid.htm

Wednesday, June 23, 2010

Pest of the Week: Black Rot

Photo Courtesy of the University of Illinois Extension Integrated Pest Management

Black Rot (Xanthomonas campestris pv. campestris)
On Cole Crops (examples: broccoli, cauliflower, Brussels sprouts, cabbage)

Life Cycle: Black Rot infects many Crucifer crops and weeds. The cycle can begin with infected plant debris left in the field (more common in warmer climates), infected seed, or infected weeds on field edges. Transmission within a crop occurs from machinery, tools, hands, wind, or rain. The disease can enter plants through wounds on leaves and roots, specialized pores called hydathodes, and insect damage sites. Bacteria grow fast within the plant, clogging the vascular system. This diagnostic characteristic of the disease is displayed as black veins and black vascular tissue in a cross section of the stem. Black Rot favors warm, wet weather and symptoms are readily observed under such conditions. A seedling or plant may still be infected when there is cooler weather present, but symptoms may not be expressed.

Plants Affected: Broccoli, cauliflower, cabbage, Brussels sprouts, and cruciferous weeds are susceptible to Black Rot. Radishes are less susceptible to Black Rot than other crucifer crops.

Symptoms: Seedlings wilt, turn yellowish, and may eventually die. More mature leaves will show V-shaped lesions that start at the margin and taper to a point farther into the leaf tissue. Leaf lesions will enlarge and turn yellow. As the disease progresses, veins may or may not turn black. The plant will drop lower leaves to expose a discolored (yellowing) stem with a tuft of leaves at the end. Cabbage heads will often be misshapen or stunted. Cauliflower leaves may have tiny black spots when Black Rot is present.

Control: Healthy plants fight disease more readily than compromised ones. Maintain seedling health by following a proper nutrient and watering program, using disease-free growing media, disease-free seed, and regularly scouting for and roguing out weak or diseased seedlings. Please read the Cabbage culture box in Johnny’s paper catalog or the Growing Information tab for any Cabbage product on the Johnny’s website for more detailed information on this and other Crucifer diseases. Keep damage in the field to a minimum by removing plant debris at the end of the season so the disease doesn’t overwinter. Remove Crucifer weeds from field edges. Work soil and plants when dry. Wet weather perpetuates disease by making it easy for bacterium to spread. Rotate out of Crucifer crops for at least two to three years in a field. Spray Champ® WG Copper Fungicide (#9778) as a preventative if Black Rot presence is suspected. Read all product labels in full and follow label instructions as specified for that particular product.

Resources:
http://urbanext.illinois.edu/hortanswers/detailproblem.cfm?PathogenID=133
http://www.ces.ncsu.edu/depts/pp/notes/oldnotes/vg16.htm
http://www.aces.edu/pubs/docs/A/ANR-0937/ANR-0937.pdf
http://vegetablemdonline.ppath.cornell.edu/factsheets/Crucifers_BR.htm